Showing posts with label DIY. Show all posts

Sunday, February 6, 2022

#100cupsofcoffee recipe // valentine's day πŸ’–

Happy Early Valentine's Day! I have a mid week pick me up for YOU, Valentine's Day, Galentine's Day OR anytime!

Here is my Mocha Coffee with Marshmallows!!

Wednesday, December 14, 2016

Nerd Crafts: Gingerbread TARDIS

@The_Gamer_Geek and I completed a Pinterest project, that I have been DYING to do since I began watching Doctor Who...gingerbread TARDIS'!

Supplies:
*One can of white frosting
* One can of blue frosting
*Graham crackers
*York Pieces
*One small tube black frosting
*Blue sprinkles
We used an entire container of white frosting as our glue.
One container of blue frosting for the TARDIS color.  Blue sprinkles and York Pieces for decoration.
We pipped the white frosting all over the cracks and used an empty creamer carton for stability on the inside.
I even let my OCD take a back seat and didn't clean up until we were totally finished!
TA-DA!!!!!!!!! 
I printed out the Police Box words since that would hav been a PAIN to pipe on {@The_Gamer_Geek would have had NO patience!} and it looks a bit better :)  I think I am going to try and preserve it to save it forever :)
I am so proud of my creation!

Share your creations in the comments below and don't forget to check out ALL our other Nerd Crafts!!

Tuesday, December 13, 2016

10 Ways to Have a Very Doctor Who Christmas

With all the excitement of the 50th Anniversary and the regeneration of the 11th Doctor in this year's Christmas special, what better way then to celebrate Christmas, than with Doctor Who! Here are TEN of my favorite ways to make your Christmas WHO-y.
1.  This TARDIS blue, Doctor Who inspired Christmas tree, shows off your fandom to the fullest!
2.  Here is a perfect ornament to add to your Doctor Who inspired tree.  Or as just a small surprise in your current tree.
3.  Don't BLINK around this Weeping Angel tree topper!
4.  Sending out cards to family, friends and Whovians?  This one is so cute!
5.  Hang a TARDIS stocking on your fireplace!
6.  Having the family over to celebrate the holidays?  Try out our DIY gingerbread TARDIS!

7.  Counting down the days till Christmas AND the Doctor Who Christmas special couldn't be more fun with this printable Doctor Who advent calendar!  One fun Whovian surprise for each day.
8.  Cozy up by the fire, watch some Who and make this adorable Doctor Who cross stitch decoration for your home.
9.  Light up your tree with a TARDIS!
10.  The perfect tee for Christmas morning!

How do you celebrate the holidays with your favorite fandoms?!  Share with us in the comments below and we can keep our list growing!  Tis' the season!

**Don't forget to get your early shop on with a present for that special nerd in your life: Check out my GEEK shirts!**

Tuesday, December 6, 2016

Nerd Crafts: Nerdy Ornaments

Christmas is one of my favorite times of year!  I LOVE Christmas decor and I love nerdy things. I wanted to mash my love of both together in this month's nerd crafts! Hope you enjoy!
Supplies:
*Various Colored Felt
*Clear Gel Tacky Glue
*Twine
*Various Fabric Paint Colors
*Scissors
*Black Tread
*Needle
Serenity Ornament - I used a CD to trace the orange circle.  Cut it out, then placed it under the yellow felt and free handed the yellow circle.  I used this Serenity logo as an example.  I used a red Sharpie to draw on the characters, but think that some sort of paint might work better {I ended up going over it with red fabric paint}.  Make sure you have sharp scissors for the felt!  I used the clear Tacky Glue to glue the circles together and for the twine on the back.
T.A.R.D.I.S. Ornament- This one was easier than I thought it was going to be.  The Tacky Glue worked fine for everything, just let it all dry before doing any painting {just to be safe}.  Black and white fabric painted worked perfect for the details.
Breaking Bad Ornament -  Taking green felt I cut out my squares, glueing two on top of each other for more stability.  I used a white fabric paint for the lettering.  When everything was dried I used the clear Tacky Glue to glue the two squares together in one corner.
Union Jack Ornament - Using blue and white felt, I cut the shapes needed and used red fabric paint for the red stripes.  This one was by far the hardest ornament to make.  I know it is not totally correct, but not horrid for a first try.  Good luck on this one :)
A Silent Film Ornament - This one I made my job harder on myself than necessary.  I took way too much time trying to draw the perfect diamond, when I could have just drawn a square and turned it!

I actually made about four variations of this one to send to all my Lamplighter friends. For mine, it came together as a happy accident.  I had extra black felt and two different sizes. I really like how this one came out.
The original design was cream felt with black lettering.  I then hand sewed a boarder of black thread. This was  super quick and easy {I am not a sewer}!  I cannot wait to give these to all my Lamplighter friends!

Total cost for all the ornaments was around $11.00 and I made a lot!  I had to make three separate trips to Michael's but I did it all for you!  Let me know in the comments how your's turn out and also if you decide to try something different.  Happy crafting!
Sunday, November 17, 2013

Doctor Who 50th Anniversary DIY Party!

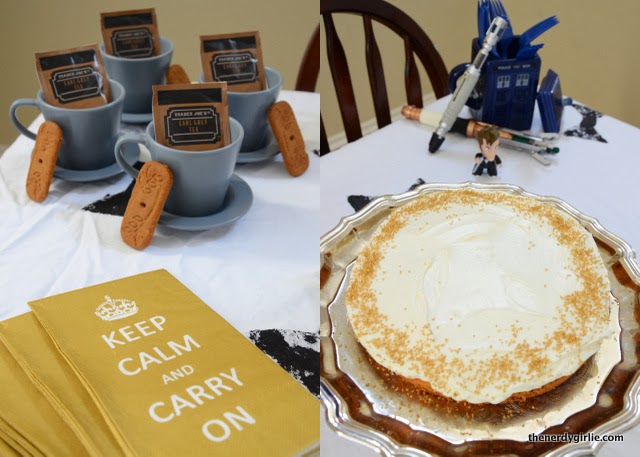
The 50th anniversary of the sci-fi series Doctor Who is arriving quickly!  This is a HUGE occasion for us nerds.  I'm sure EVERYONE is planning a party.  I have had one Doctor Who DIY party before, but for the 50th I had to upgrade my party!  Check out it all below!
I found these GOLD Keep Calm and Carry On napkins at a local bookshop and HAD to get them.  If you do not know, a 50th anniversary is the golden anniversary, so that was something I wanted to incorporate into my theme.  Add in a cuppa tea and biscuits and you are on your way to a thoroughly British get together!  And of course you cannot have a celebration without cake!!
Another adorable thing that I picked up at the same bookstore, was this lovely map of London for only $3.99!  I was not able to find a frame for it so I just popped it up on the wall.  The Union Jack flags I had from our SherlockeDCC party.
I was so happy to be able to use my hand made bow tie table cloth again!  It was an easy make, by just cutting sponges into bow shapes and stamping on the fabric.  For our appetizers we had to go with the classic fish fingers and custard!  I found this awesome Union Jack Duck Tape at Michael's and had to add it to my plates!

How are you all celebrating Doctor Who this November 23rd?  Share with us in the comments below!! Happy WHO-ing!!

Tuesday, October 1, 2013

Nerd Crafts: DIY Nerdy Magnets

Supplies:
*Nerdy stickers
*Roll of magnetic paper {purchased at Michael's}
*Scissors
Step one:  Peel off chosen sticker and place on the back of magnet paper roll.
Step two:  Cut.
Step three:  Make your refrigerator nerdy!
I have been doing this little craft since I began getting my Get Glue stickers about three years ago.  I LOVE these awesome and FREE stickers, but had no idea what to do with them.  Making them into magnets, I can decorate my fridge without it being permeant!  

BONUS TIP:  When I don't like a sticker anymore, I just place a new one on top!  Saves magnet paper and time!

If you EVER create one of our Nerd Crafts please share with us!  We would love to see your work!

Monday, September 16, 2013

DIY Dexter Halloween Party

With the FINAL episode EVER of Dexter THIS Sunday September 22nd and Halloween coming up, I thought perfect time for a party!!!  I have been a fan of Dexter since the beginning and have even read all the books!  So to send off one of my favorite fandoms I decided to have a Dexter theme dinner party!
I started off by wrapping the entire table and chairs with plastic wrap.  That was relatively easy and a more themed touch than just a table cloth.  The black garbage back is actually the drink dispenser!  I decided to dress it up a bit.  The ice bowl for the drinks has the ice truck killer's famous victims hand in it!  I painted the nails myself.  Thank you dollar store for the idea!

If you click on the collage below you can see our Dexter victims pictures hanging from the chandler!  It was a fun way to help guests get immersed in the theme!
For the menu I had a CHOP salad, pigs in a blanket {which I called "bad guys in plastic"} and blood slide cookies.  The cookies are from Trader Joe's and such a yummy fall tasting treat!  To drink we had a red sparkling pomegranate juice also from Trader Joe's.

In the end clean up was a breeze!  Dexter would be proud at how well I cleaned up leaving not a trace!  Maybe a bit of finger prints though!  OOPS!!

To further your party's theme you can also check out our Dexter and Debra Every Day Cosplays!

Who is excited for the series finale of DEXTER??

Monday, September 2, 2013

Nerd Crafts: Large Nerdy Tee Into A Nerdy & Girlie Tee or Dress

Ever since Pinterest came out I have been loving all the awesome DIY projects featured there!  Some are easy, some are HARD!  Today's Nerd Craft is SUPER simple!  We all get those HUGE swag t-shirts at conventions.  Most I pass on to The Hunny, but some I REALLY love.  They use to just be nightshirts until Pinterest.  Now you can make them into a cute dress or girlie fitted tee.  Leave the shirt long for a dress or swimsuit cover up.  Tuck into shorts and wear as a tee!  Either way, you'll look great!

Step one:  Pull the t-shirt over your head as normal then fit your arms through the head hole.

Step two:  Take each sleeve and fold to the front of the shirt, tucking them into the neck hole.

Step three:  Wear and enjoy a new girlie fitting tee or dress!
Hit up the pool or beach and represent your favorite fandom in style!

Do you have a lot of swag tees at home getting no love?!  Share with me how you do this easy tee makeover over on Twitter or leave your comments below!

Monday, July 8, 2013

Nerd Crafts: TARDIS Tee

With San Diego Comic Con coming up FAST, I am trying to pull together all the outfits I am going to wear this year.  First up preview night.  I already have these amazing Her Universe TARDIS leggings and needed a more plain T to go with them.  Enter this month's nerd crafts!

Supplies:
*Scissors
*X-Acto Knife
* Card-stock
*Bleach
*Spray Bottle
*Plain Dark Tee Shirt
Step one:  I printed out the TARDIS template and cut it out.
Step two:  This was the hardest part for me.  I used an X-acto knife to cut out the windows and signs.  In the end I just went back and taped in the window dividers  which didn't make much of a difference in the end.  Your call.
Step three:  Lay out your tee.  I put a piece of card stock in between so there was no leaking to the back of the shirt.  Position your template and hold in place.  Spray lightly, then let the magic happen {wash when you reach your desired coloring}!  I ended up washing the Tee right after to stop the bleach from turning any more.  Alone of course.

Learning curve:
*Instead of card stock I would use a plastic if possible.
*Tape down/pin the stencil to keep it in place in case you need to spray a bit more.
*You HAVE to check out Crafty Lil Thing for her amazing tips & a TARDIS template!

Hope you enjoy & as always let me know what you think in the comments or tweet me pictures of your  Nerd Crafts!!

Monday, April 22, 2013

Nerd Crafts: 3D Glasses Hair Clip

I found a 3D glasses hair clip that I ADORED on Etsy and wanted to use for my 10th Doctor SDCC cosplay.  But it was $16!  Then I had a moment of inspiration and was like maybe I could make it myself!  So here we go!

Supplies:
*3 pieces of felt {red, white, blue}
*Sharp Scissors
*Pencil
*Glue Gun
I bought the felt at Michaels for a total of $1.70!  I purchased gitter white and regular blue and red.  I found that the more stiff felts were easier to work with.
I stayed as much to the sharp corners as I could when cutting to get straight lines.  Then folded very slightly in half to find the middle to cut the nose hole.
I then measured how large I wanted the colored portions to be.  I ended u going with 1 1/2 inches by 1 inch.
When cutting out the eye pieces I made the slightly bigger to have room for shaping.
I had an extra hair clip lying around so I used that.  The pack was originally $3.79 for two clips.  I glued on the eye pieces to the non-penciled side.  Let dry for a moment then glued onto the clip.  I then flipped the clip over and pressed down so it got a good seal.
This total DIY cost only $1.70 since I already had the clip!  I was even able make 13 more!  I just had to purchase more clips!  I cannot WAIT to use this for my 10th Doctor cosplay at SDCC this year!!!!